https://create.arduino.cc/editor/SAULPAYAN/f9417632-bb36-4b60-876e-d380dfe2a998/preview
This is a link to the basic LED code, it also reads one potentiometer.
Sunday, March 1, 2020
Thursday, February 6, 2020
helpful links
https://www.instructables.com/id/Guino-Dashboard-for-your-Arduino/
https://github.com/speeddragon/Arduino-CarSensorDashboard/blob/master/car_sensor_dashboard/car_sensor_dashboard.ino
https://www.ebay.com/itm/Race-Car-Ignition-Switch-Panel-Engine-Start-Toggle-Push-Button-DC-12V-Universal/283505723211?hash=item420242074b:g:UrwAAOSwXFlc9g3B
https://github.com/speeddragon/Arduino-CarSensorDashboard/blob/master/car_sensor_dashboard/car_sensor_dashboard.ino
https://www.ebay.com/itm/Race-Car-Ignition-Switch-Panel-Engine-Start-Toggle-Push-Button-DC-12V-Universal/283505723211?hash=item420242074b:g:UrwAAOSwXFlc9g3B
Sunday, February 2, 2020
Saul Payan-FPD- Update
 |
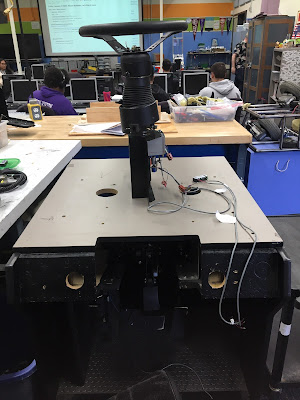
| Front of First Person Driver, with steering wheel column and dashboard taken off. |
 |
| Starting the process of building all the electrical connections. |
 |
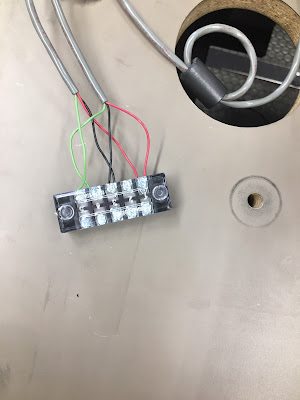
| Screw down terminals being used to group ground and power of outputs together. Common signal wires left individually. |
 |
| Example of procedure explained above. |
Saul Payan - FPD - LED Circuit Lab
 |
| Linear potentiometer |
Saul Payan - FPD - Data Sheet# 1
DATA SHEET
Presented here is the Data Sheet (graph) of the:
LED Circuit Board, located in the back of the car dashboard of the First Person Driver(FPD).
The goal of this Data sheet is to leave the reader feeling confident in their ability to distinguish between the 17 different LED output wires and their purpose, know all the inputs located in First Person Driver itself, and have a general idea of how the electronics system works.
In graph #1, we explain which LED "D" Number (Ex. D-14, D-7, D-15) connects to what pins on the board, along with;
~ Wire Color Scheme ( first-most color being the "main", with a single-stripe secondary color)
~ LED-Color Output
* There are 20 Male-pins present on-board, only *15 are used as outputs (15 LED's on-board).
Of which, 15 wires ( D-1 through D-15) stem from the Female connector, connecting to the Male pins (1 through 20) on-board. D-19- and D-20 are used as Ground and Power. Each of the wires, D-1 through D-15, can act as a ground, creating a closed circuit, when connected to D-20.
Subsequently, there will be 2 additional graphs, that;
~ assign a function to each of the 15 LED Outputs.
~ show the 10 (different) Inputs I will be using, and how each of them turns on one specific LED Output,
along with the 4 Unused LED outputs I plan to change the function of.
(Note- Number of outputs may change in the future. Some inputs have multiple outputs, along with no outputs at all,which will be shown in graph #3).
We will also explain how we plan to use the Speedometer and Tachometer as additional (Non-LED) outputs (12 Outputs).
*(Directly underneath, I have provided a diagram of reference, so the reader can acknowledge the 1-20 pins (located on the Circuit board) being discussed).
> Pins (Male, located on-board)
| 1 | 2 |
| 3 | 4
| 5 | 6
| 7 | 8 |
| 9 |10|
11|12|
|13|14|
|15|16
|17|18
|19|20|
GRAPH #1
LED PINS: Wire Color: LED Color:
D-1 = Pin 1 Purple (P) RED
D-2 = Pin 2 Yellow/ Red (Y/R) RED
D-3 = Pin 3 Yellow/Green (Y/G) RED
D-4 = Pin 4 Black/Yellow (B/Y) RED
D-5 = Pin 5 Yellow/Orange (Y/O) RED
D-6 = Pin 6 Yellow/White (Y/W) RED
D-7 = Pin 10 White/Brown (W/B) RED
D-8 = Pin 11 Grey (G) RED
D-9 = Pin 12 White/Purple (W/P) RED
D-10 = Pin 13 Yellow/Purple (Y/P) BLUE
D-11 = Pin 14 White (W) RED
D-12 = Pin 15 Grey/Black (G/B) ORANGE
D-13 = Pin 7 Yellow/Grey (Y/G) RED
D-14 = Pin 8 White/Blue (W/B) Green
D-15 = Pin 9 White/ Green (W/G) Green (
----------------------------------------------------------------------------------------------------------------------------------D-19 = Pin 19 Yellow (Y) N/A (Ground)
D-20 = pin 20 Yellow (Y) N/A (Power)
GRAPH #2
LED Output: Function:
D-1 "1"
D-2 "2"
D-3 "3"
D-4 "D"
D-5 "N"
D-6 "R"
D-7 "Oil Pressure"
D-8 "Brake System Alert"
D-9 "Seat Belt"
D-10 "High Beam Light"
D-11 "Temperature"
D-12 "ABS" (Anti-Lock Breaking System)
D-13 "p"
D-14 "Left Blinker"
D-15 "Right Blinker"
Graph #3
Inputs(10): Outputs(12)
1.) Gas N/A
2.) Break N/A
3.) Steering Wheel N/A
4.) Speaker N/A
5.) E-Brake N/A
6.) Gear Shift ⇨ (1, 2, 3) (P, R, N, D)
(D-1, D-2, D-3) (D-13, D-6, D-5, D-4)
7.) Horn N/A
8.) Turn Signals ⇨ (Left/Right Blinker)
(D-14,D-15)
9.) Seat Belt ⇨ (Seat Belt)
(D-9)
10.) Anti-Lock ⇨ (D-12)
N/A Speedometer
N/A Tachometer
----------------------------------------------------------------------------------------------------------------------------------
Unused Outputs:
Oil Pressure (D-7)
Temperature (D-11)
High Beam Light (D-10)
Brake System Alert (D-8)
The speedometer and Tachometer are additional outputs displayed on the car dashboard. They will receive a signal from an Arduino,which will transmit input from the potentiometer located on the Gas and Break pedals. When powered, we will measure the resistance of the potentiometers and see the difference when they are and aren't fully pressed down. This will allow us to come up with a ratio of MPH that can be sent as a signal to the Tachometer and Speedometer.
Thursday, January 23, 2020
Mr. Burnham - Driving the Tachometer - How to turn on and off 12 with 5 volt Arduino or Raspberry Pi IO
Saul, this link may be a way to drive the tachometer and Speed gauges. You want to protect the 5 volt Arduino / Pi system, but be able to have a 12 volt current switch on and off... see this link
It's for PWM control of a 12 volt fan. We could maybe also use a standard motor controller like https://sites.google.com/view/steam-clowns-closet/motor-controller-l298n-dual-h-bridge-motor-controller
Talk to me next time we do Robot Club... You will need to learn how to run the Oscilloscope... so you also will want to try this tutorial...
- https://www.baldengineer.com/pwm-3-pin-pc-fan-arduino.html
- https://electronics.stackexchange.com/questions/230802/12-volt-switched-by-5-volt
It's for PWM control of a 12 volt fan. We could maybe also use a standard motor controller like https://sites.google.com/view/steam-clowns-closet/motor-controller-l298n-dual-h-bridge-motor-controller
Talk to me next time we do Robot Club... You will need to learn how to run the Oscilloscope... so you also will want to try this tutorial...
- Oscilloscopes Made Easy #1 - Introduction to Oscilloscopes (Rigol DS1104Z)
- Oscilloscopes Made Easy #2 - Simple Triggering (Rigol DS1104Z)
- Rigol - BASICS OF OSCILLOSCOPES
- How to Use an Oscilloscope - General overview for a different scope... but still good
saul-robot club-FPD
Today for open lab I worked on the First person driver. I was able to screw the seat back down,but a screw is missing. We are going to try and see if we can acquire the full set of screws.The day before today, I soldered and connected the chair cables to the platform. Also,I was able to measure the resistance of both the gas and break pedals. The data is logged into my notebook. I plan to upload it soon. The potentiometer on the gas pedal seems to be broken so I plan to restore it or replace it.
My goal is to have a fully functional First Person Driver. It is a Remote control drone that reacts to your actions on the the Driver's seat. The user will be able to view the location of the car based on the camera view,which will be mounted on the car.
There are many things that we must do before the FPD is fully functional,of which include;
-measuring the resistance of every sensor we plan to use and labeling the wires.
-Fixing the broken end of the turn signal on the steering wheel
-Connecting all the sensors onto a breadboard controlled by an arduino or raspberry pi.
-programming code for each sensor.
-Adding a monitor that can receive transmission from the drone style car.
-Adding sensors and a volt meter to the car. measuring how fast the car goes and converting it into a ratio of MPH. -Here are a few photos documenting the slow but steady process.-


Subscribe to:
Comments (Atom)


